You have no items in your shopping cart.

MEET the Founders & Team
Mike and Joylynn Jelliff, the founders of GeekStands.com as well as musicians. They are owners and users of the products GeekStands.com sells.
Learn about us!


04
Dec

“Sometimes I can only groan, and suffer, and pour out my despair at the piano.”
These are words famously said by Frederic Chopin, one of the greatest pianists and composers of all time. He spoke these words when describing his love of music, and how sometimes he could only express himself through the piano.
But If you’ve had the displeasure of experiencing a wobbly piano bench, unlike Chopin, you may have found yourself groaning and moaning for entirely different reasons.
A wobbly piano bench is a frustrating distraction for any musician, especially during an important performance or practice session.
Thankfully, the cause of the wobbling is usually fairly easy to diagnose, and once you have a positive identification of the root cause, fixing your piano bench typically only takes a few easy steps.
Today, we take a close look at the most effective solutions to common causes of a wobbly piano bench. Among the solutions we’ll look at are:
- A wobble-proof installation sequence for maximum balance
- The correct bolt-tightening technique for wobble-free support
- How to check for panel inconsistencies and even weight distribution
Finally, we’ll equip you with some insider tips to help keep your piano bench sturdy as a rock over years of tickling the ivories.
Step 1 - Identify the Problem
When you notice the first wobble, that’s your sign to break out your detective hat and find the instability’s root cause. Typically, piano bench wobbles are caused by three things:
- An uneven leg
- An uneven frame
- A combination of both
To get started, place your piano bench on a level surface and examine it from different angles. Take note of any visible irregularities. These may include things such as a leg that appears shorter than the others or a warped frame.
But if the issue isn’t immediately apparent, don’t worry. We'll dive deeper into some common customer-reported problems to help you find the culprit.
After your preliminary examination, you’re ready to narrow down the specific area causing the wobbles.
The easiest way to do this is to have someone sit on the bench while you gently press down on each corner. If the teetering persists when you apply pressure on a specific corner, that’s a sign that the frame or leg in that area needs your attention.
Alternatively, you can slide a piece of paper under each leg, one after another. If the paper easily slides under one of the legs while the others remain firmly on the ground, that’s your sign that you’ve found the leg or frame in need of fixing.
But if your preliminary investigations did not bear fruit, let’s take a deeper dive through a study of some common customer-reported issues.
The Two Most Common Customer-Reported Issues
After almost two and a half decades in the music industry supplying musicians with high-quality accessories and equipment, we discovered that the majority of Geek Stands customers who reported wobbly piano benches had their troubles traced back to two primary causes:
-
An incorrect leg installation sequence: This occurs when you fully tighten one leg onto your bench frame before attaching any of the other legs.
Fully tightening one leg, and then moving on to the next, and so on, results in an uneven distribution of pressure across your piano bench, causing wobbling and instability.
- A loose bolt inside the leg: Most people overlook this issue because the bolt in question is typically hidden by a small end cap on the leg. However, this loose bolt can cause your piano bench leg to wobble and drive you nuts trying to figure out why.

Thankfully, both of these problems can be easily addressed with the right knowledge and tools—and we're here to guide you through the process step by step.
Gather Necessary Tools
To fix your wobbly piano bench, the right tools are the first step to setting yourself up for success. Here’s a list of the tools you will need:
- A measuring tape or ruler: To measure the length of your bench legs and frame when checking for any inconsistencies
- Sandpaper: This comes in handy when smoothing out any rough edges left by the sawing down a bench leg
- Rubber stoppers: These are optional, but highly recommended as an additional measure to prevent future wobbling
- A screwdriver set: You may need a flathead screwdriver to pop off your bench legs’ end caps. You’ll also need a suitable screwdriver to tighten your bracket screws.
- A wrench: This will come in handy when tightening the bolts in your piano bench legs after going through the proper installation sequence
- A level: This is one of the quickest and easiest ways to establish whether or not your piano bench is balanced after you’re done fixing it.
With your tools at hand, now we can get down to brass tacks. Let's explore the different steps and techniques you can use to permanently fix your wobbly piano bench, whether it's caused by uneven legs or frames.
Step 2 - Confirm the Leg Installation Sequence
Follow these simple steps to confirm that your piano bench legs are installed in the correct sequence:
- Examine the current state of your piano bench's leg assembly. Take note of the positions of the legs and the tightness of the nuts holding them in place.
If you notice any discrepancies or suspect an incorrect installation sequence, proceed to step two.
-
Loosen all the nuts in the leg assembly by hand, but don’t remove them completely. You want to have some flexibility to allow for adjustments in the leg positions while maintaining their attachment to the frame.
- When the nuts are sufficiently loosened, you can now proceed to tighten them in the correct sequence. First, hand-tighten each nut in the following order: front left, back right, front right, back left.
This sequence helps ensure even pressure distribution across all four legs of your piano bench reducing the chance of wobbling.
- After hand-tightening the nuts, use a wrench to fully secure them in the same sequence as in step three above. Be sure to apply adequate pressure, but not so much as to overtighten the nuts. This may damage your bench’s legs or frame.
To further ensure that the nuts won’t come loose any time soon, you can take a step further and use Thread Locker to secure your nuts in place. Here’s a quick video showing how you can go about doing that.
There you have it! If your piano bench’s wobbliness was caused by an incorrect leg installation sequence, then this simple DIY repair is all you need to resolve the teetering and ensure stability.
Step 3 - Check the Bolts Inside Each Leg
Sometimes, the culprit behind your wobbly piano bench is the loose bolt hidden within the bench legs. In this instance, diagnosing and resolving the wobbliness can be tricky since the bolt is usually concealed by a small cap on top of the leg, and often overlooked.
To resolve piano bench wobbliness as a result of this sneaky bolt, follow these easy steps:
- If your piano bench has end caps covering the tops of the legs, use a flat screwdriver to pry them off. Be careful not to damage the cap or the leg itself.
- When the caps pop off, you'll have access to the hidden screws. Grab your trusty Phillips screwdriver and carefully tighten each screw inside the top of the leg but be careful not to over-tighten them.
- When the screws are sufficiently tightened, reinsert the end caps (if your piano bench has them) by pressing them back into place to ensure a snug fit.
And there you have it—these simple steps are an integral part of ensuring your music furniture stays stable and sturdy. They also free you from that wobbly annoyance that stood in the way of your musical performance.
Step 4 - Check for Rubber Feet Under All Legs
Another essential aspect of piano maintenance is ensuring that all your bench legs have rubber feet in place. Rubber feet provide added stability and help protect your floors from scratches.
Examine each leg and make sure that all the rubber feet are properly attached and in good condition. If any are missing or damaged, now’s a great time to replace them.
While not immediately obvious, your piano bench rubber feet play a crucial role in your performance, for example, rubber feet:
-
Provide stability: they prevent your piano bench from sliding around or moving unintentionally as you play. If one or more rubber feet are missing from your piano bench, that can trigger a wobble that may lead to potential accidents or damage.
-
Offer protection: they cushion your floor and absorb a large amount of shocks and vibrations This is essential in spaces with wooden floors, or floors prone to scuffs and damage.
They also help protect your bench from excessive wear and damage due to exposure and friction with the floor.
- Reduce noise: rubber feet help dampen vibrations and reduce noise from your piano bench touching and moving against the floor. This is helpful in situations where you don’t need background noise cutting through your performance or rehearsal.
Step 5 - Measure the Length of All Four Legs From the Rubber Feet to the Top
Ensuring that all four legs in your piano bench are the same length is one of the quickest and easiest ways to get to the bottom of a wobbly bench.
To do this, grab your measuring tape or ruler, and carefully measure each leg from the bottom of the rubber foot to the very top. Take note of the measurements and compare them.
Ideally, all four legs will have the same length. Even a small difference in length is enough to be the root cause behind a teetering piano bench
If you notice discrepancies in the leg lengths, consider addressing the issue with appropriate adjustments. But to guarantee the best results, contact the Geeks for professional assistance and a more permanent solution.
Expert Tip: Prioritize accuracy by using a precise measuring tool, such as a digital caliper, for accurate leg length measurements.
Step 6 - Ensure That the Wood Panels Are Level
If you've already gone through all the previous steps, and your piano bench still wobbles, it's time to take a closer look at the upper frame and the four wooden panels that make up the bench's construction.
Your typical piano bench structure consists of two short panels and two long panels, which are interconnected. If one of these panels is significantly warped or uneven, it may be the root cause of your wobbling problem.
To conduct a thorough inspection of your panels, remove any cushions or padding from your bench's surface and visually examine each panel for any noticeable warping or unevenness.
You can also use a level tool or a straight edge to confirm that the panels are reasonably level. The panels don't have to be perfectly level, but any extreme warping will lead to instability.
If you identify a significantly warped panel, you need to address the issue to restore your bench's stability.
Depending on the severity of the warp, you may be able to sand or plane the uneven area to level it out. However, if the panel is too warped or damaged, it might be best to replace it with a new, level panel.
If you purchased your piano bench from Geek Stands and identified this issue, reach out to us and we’ll be happy to send a replacement part without needing you to send back the warped or damaged panel.
At Geek Stands, we take our customer satisfaction very seriously, that’s how we've managed to build a community of trusted customers over the past two and a half decades and maintained a 99 percent satisfaction rating. We’d love you to join that happy majority too.
Take Adrian and Dana for example, when they noticed an issue with their piano bench, they promptly reached out and sent us a photo of the damaged part.
The piano bench was a Christmas gift, so we knew we had to act quickly. We sent the replacement part through express delivery to ensure Adrian and Dana had the holidays they deserved. In their exact words:
“We had a broken part with our piano bench. It was a disappointment when we unwrapped it at Christmas and one of the rails was split. With one communication and a photo to them, they sent the replacement part express delivery and had it taken care of.”
At Geek Stands, we strive to deliver the best quality products 100 percent of the time. But sometimes things can go awry, c’est la vie. But when things don’t go according to plan, know you can count on us to rise to the occasion.
We believe the mettle of a company isn’t measured by how they act when everything’s going right, but by how they handle left-field situations.
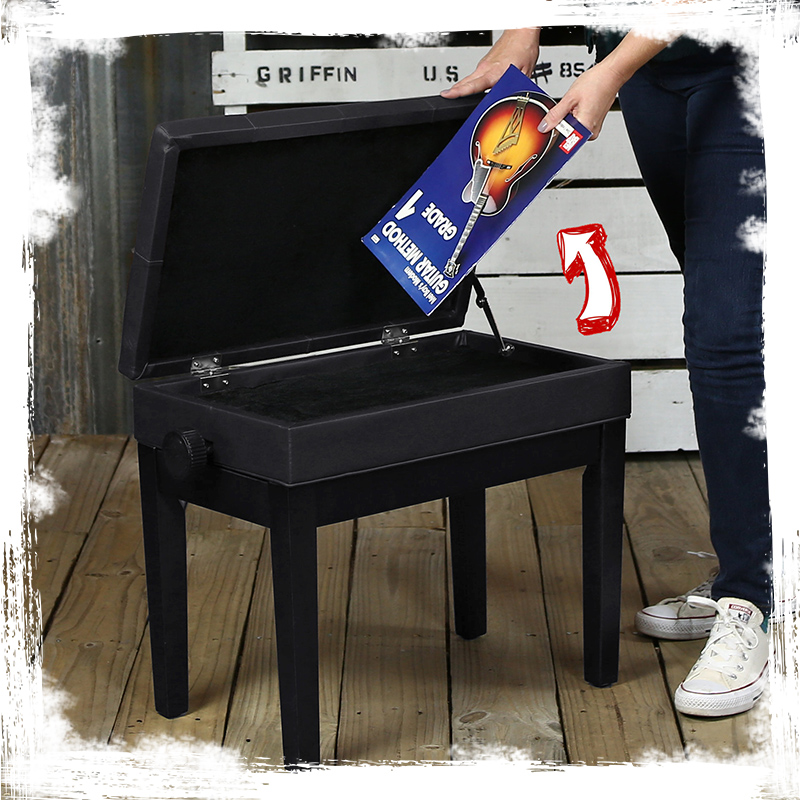
Learn More: Have you considered an adjustable padded piano seat before? Our previous article provides three reasons why you should shortlist it.
Here is a brief walkthrough video on the adjustable padded piano set:
Step 7 - Check the Length of the Long and Short Panels
Another common cause of a wobbly piano bench is inconsistencies in the lengths of the panels that make up the frame of your bench.
To address this issue, you'll need to ensure that the two long panels are of the same length, as are the two short panels. Discrepancies greater than 1/4" (a quarter inch) can lead to an unstable frame and a wobbly piano bench.
Start by carefully measuring the long panels, one at a time. Use a tape measure or a ruler to accurately determine their lengths and take note of any differences. If you find a discrepancy greater than 1/4", it's time to consider a DIY repair or replacing the affected panel.
Follow the same process for the short panels, measuring each panel carefully and comparing their lengths to ensure they are exactly the same, or within acceptable margins. Again, if there is a difference greater than 1/4", it may be time to crack open your toolbox.
Of course, if you ordered your piano bench from Geek Stands, all you need to do is get in touch and send pictures of the problem panels. We’ll be glad to send out replacement parts faster than greased lighting.
But if you got your piano bench from elsewhere, and fancy a crack at a DIY repair, we get into exactly what you’ll need to do in Step 8. But before then, first, you’ll need to mark the high point of your identified problem area with a pencil.
This mark will act as a visual aid, helping guide you and ensure that you're focusing on the right area.
Step 8 - Sand the High Point for a Level Surface
Using a sanding block or sandpaper, carefully sand down the high point you've marked.
Sand gently and check your progress frequently to avoid over-sanding and causing further damage. Remember, slow and steady wins the race.
Your goal is to make the panel as level as possible to restore stability to your piano bench. You’ll need to sand multiple areas to achieve the desired level surface.
Take your time and be persistent to get the best results.
Step 9 - Secure Panel Brackets for Optimal Stability
Once you’re done fixing the problem areas, you can proceed to the next step, that is, reassembling your bench.
First, you must ensure all your panel bracket screws are fully tightened. Each panel bracket has three screws on either side.
Before we proceed though, check out this video showing how to repair a wobbly piano bench with leg brackets so you know exactly what to do going forward.
An often-overlooked aspect of maintaining a sturdy piano bench is making sure that all the screws on each panel bracket are screwed in all the way. Keep this in mind as you work, these screws secure your bench's frame and help maintain its stability.
To check and tighten all your screws, follow these simple steps:
- Locate the panel brackets on your piano bench. There’s one on each corner where the panels meet.
- Inspect each bracket for any loose or missing screws. There are three screws on either side of a panel bracket, so a total of six screws per bracket.
- Using your trusty screwdriver, tighten any loose screws by turning them clockwise until they are snug. Be careful not to overtighten, as this can damage the wood or strip the screw threads.
- If any screws are missing, replace them with appropriate-sized screws from your local hardware store or contact the manufacturer or retailer for replacement parts.
If that happens to be Geek Stands, give us a shout at 903-483-2761 or support@GeekStands.com and we’ll set things right.

Properly secured screws on each panel bracket will enhance the stability of your piano bench, and eliminate any wobbles so you can enjoy a comfortable, uninhibited joy as you play your piano.
Test the Stability of Your Piano Bench
After your DIY repair project, it only makes sense that you test the stability of your piano bench to ensure it no longer wobbles.
To do this, sit on your bench and lean in different directions to see if it remains steady. Try playing the piano and observe if the bench tilts or moves. If your bench still wobbles, you may need to readjust the legs or frame until you achieve complete stability.
Alternatively, you can use a level to confirm that your bench is perfectly aligned. This is usually a good sign that your bench is well-balanced and wobble-free.
It’s important to test your bench thoroughly before using it in your practice sessions or during performances. A wobbly piano bench can cause discomfort, give you bad posture, throw you off your game, and even lead to injury.
Conduct these simple tests to ensure you’ll have a comfortable and safe experience while you do what you love—make music.
Additional Tips for Preventing Future Wobbling
In addition to fixing your wobbly piano bench, you need to take steps to prevent it from happening again in the future. Here are some helpful tips to help safeguard your bench's long-term stability:
- Check your bench’s legs regularly: With regular use, your piano bench legs may become loose. To prevent this, make it a habit to check the legs as part of your regular piano maintenance and tighten any screws or bolts as needed.
- Add rubber stoppers to your bench’s legs: This is an effective way to prevent wobbling in the long run. Rubber stoppers create a stable base and reduce the risk of slipping or sliding, which may loosen your bench’s legs.
- Don’t expose your bench to extreme temperatures: Extreme heat or cold, and sharp temperature fluctuations will cause the wood in your bench to warp and bend, destroying its balance. Keep your bench in a cool, dry place away from direct sunlight or heat sources.
- Only use your bench for its intended purpose: Pianos and keyboards are heavy instruments that require a sturdy bench. Avoid using your bench for other purposes, such as standing on it or using it as a step stool.
- Maintain your bench regularly: It’s important to maintain your piano bench regularly so you can catch any issues before they become problems. Your bench maintenance includes regular cleaning, oiling the wood, and tightening any loose screws or bolts.
Bonus Tip: How do you choose the right piano bench for you? This article covers three things you need to consider when buying one.
Discover Geek Stands: Your Source of Quality Music Studio Essentials

Musicians who want to perform at their best know that stability, comfort, and the right equipment are essential ingredients to their craft and artistry.
As lifelong music lovers and a team that comprises some retired performers—our founder, Mike played drums for a few bands in the ‘90s—at Geek Stands can relate.
This is why we strive to go above and beyond in the delivery of high-quality piano accessories and music equipment, at the most competitive prices.
|
|
|
|


It’s this love for music that also drives our customer service policies like our one-year warranty, and our response to any mishaps, such as those that can cause a wobbly piano bench.
So whether you’re in the market for a sturdy, high-quality piano bench, or in need of help fixing the one you’ve already got, Geek Stands is exactly the place you need to be.
Here is a table summarizing common causes of wobbly piano benches with their symptoms and possible solutions:
| Cause | Symptoms | Solutions |
| Uneven Leg | Bench wobbles or tilts when pressure is applied | Adjust leg length or add padding under shorter leg |
| Uneven Frame | Bench wobbles or rocks from side to side | Check and adjust frame alignment |
| Combination of Uneven Frame and Uneven Leg | Wobbling and instability from multiple sources | Address uneven legs and frame alignment issues simultaneously |
| Incorrect Leg Installation Sequence | Bench is unstable or wobbles inconsistently | Remove and reinstall legs in the correct sequence |
| Loose Bolt | Bench wobbles or feels unstable even when not in use | Tighten all bolts and screws |
With our commitment to delivering the best value with deals of up to 80 percent off, and promise of the best customer service you cannot go wrong with Geek Stands.
Visit our online store to check out our collection of piano benches and music furniture, or get in touch with any questions and let us know how we may be of assistance.